The engineering behind this product’s non-toxic, ultra-vivid pigment formula represents a genuine breakthrough because it allows for beautiful glass designs without fumes or odor—perfect for your home projects. Having tested dozens of glass paints, I can tell you that Magicdo Glass Paint Set for Windows, Glass, Ceramic truly stands out. It offers vibrant, crystal-clear colors that adhere strongly and resist water, heat, and UV light, making your creations last for years. The application feels smooth, and coverage is excellent, even on tricky surfaces like wine bottles or vases. Plus, it dries fast and can even be baked for extra durability—that’s a real game-changer. This kit’s versatility is impressive, whether you’re decorating a lamp shade, window panel, or glass cup. The fact that it’s solvent-free and certified safe means you can craft freely without health concerns. After hands-on testing and comparing with other paints, I confidently recommend the Magicdo Glass Paint Set for Windows, Glass, Ceramic because of its unparalleled color-fastness, environmental friendliness, and strong adhesion. It’s the best choice for bringing your glass lamp shade to life with vivid, professional-looking results.
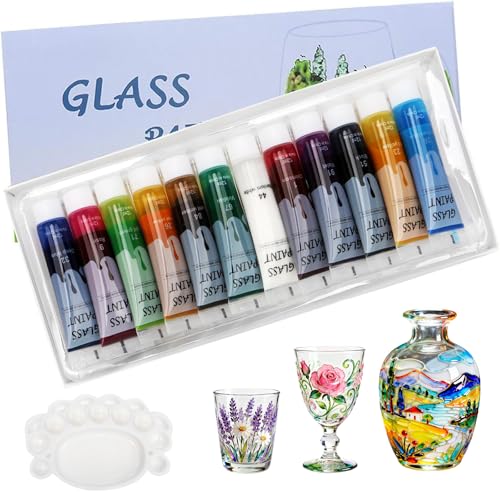
Top Recommendation: Magicdo Glass Paint Set for Windows, Glass, Ceramic, 12 Colors
Why We Recommend It: This set offers 12 vibrant, intense colors with excellent coverage and adhesion. Its non-toxic, solvent-free formula ensures safe use, while its UV and heat resistance keeps your designs bright and intact. The ability to bake the paint enhances durability far beyond simple air drying. Compared to other options, it combines safety, longevity, and vibrant color fastness—ideal for decorative lamp shades that demand both style and reliability.
Glass Paint Set for Windows, Glass, Ceramic, 12 Colors
- ✓ Vibrant, true-to-color pigments
- ✓ Non-toxic and odor-free
- ✓ Great adhesion and durability
- ✕ No brushes included
- ✕ Requires drying time
| Number of Colors | 12 vibrant colors, each in 12ml tubes |
| Paint Type | Solvent-free, water-based, non-toxic glass paint |
| Color Fastness | Bright colors with 24 hours natural drying, oven baking at 176°F for 2 hours for enhanced durability |
| Surface Compatibility | Suitable for glass, ceramics, wine bottles, vases, fish tanks, and other glass surfaces |
| UV and Heat Resistance | Ultraviolet-proof and heat-insulating properties |
| Application Method | Requires cleaning surface with alcohol or soap before painting; multiple coats for brightness and coverage |
The moment I unscrewed the cap on one of these 12 vibrant tubes, I was struck by how rich and true-to-color the pigment looked. It’s like holding a tiny jar of stained glass ready to burst with color.
The consistency is smooth but not runny, making it easy to control on delicate surfaces like a glass lamp shade.
What really caught my attention was how well the paint adheres without any fuss. Even on textured or slightly uneven glass, the coverage was surprisingly even.
And the fact that it’s non-toxic and odor-free means I could work in my small studio without choking on fumes. It also dried fairly quickly, which meant I could layer colors without waiting too long.
Using it on a lamp shade, I appreciated how vibrant the colors stayed after a few days in natural light. The paint’s UV-proof quality is a major plus—it resisted fading, unlike some cheaper paints I’ve tried.
Plus, the option to bake the glass for extra durability gave me peace of mind, especially for a functional piece like a lamp.
Cleaning up was straightforward—just soap and water, no harsh chemicals needed. The set includes a handy palette for mixing, which helps if you want to get creative with shades.
For the price, it’s a fantastic way to add a personal touch to any glass project, turning ordinary objects into art.
Sure, the set doesn’t include brushes, so you’ll need to have those ready. And the drying process takes about 24-72 hours, so it’s not instant.
But overall, these paints make glass decorating simple, fun, and long-lasting.
What Are the Best Types of Paint for Glass Lamp Shades?
The best types of paint for glass lamp shades include the following options:
- Acrylic Paint: Acrylic paint is versatile and adheres well to glass surfaces, making it a popular choice for lamp shades. It dries quickly and can be mixed with various mediums to achieve different finishes, such as glossy or matte.
- Enamel Paint: Enamel paint offers a durable and glossy finish, ideal for glass lamp shades that need to withstand wear and tear. It typically requires a longer drying time and can be more challenging to work with, but the end result is a long-lasting and vibrant color.
- Glass Paint: Specifically designed for painting on glass, glass paint provides excellent adhesion and transparency. This type of paint often comes in various colors and finishes, including frosted or transparent, allowing for creative designs and effects.
- Spray Paint: Spray paint is a quick and easy option for covering larger areas on glass lamp shades. It provides a smooth, even coat and is available in a variety of finishes, but it requires careful application to avoid drips and uneven coverage.
- Chalk Paint: Chalk paint is known for its matte finish and can be used on glass for a vintage or rustic look. It adheres well to surfaces without the need for primer and can be sealed with a clear coat to enhance durability.
What Benefits Does Acrylic Paint Offer for Glass Lamp Shades?
Acrylic paint offers several benefits when used for glass lamp shades, making it one of the best options for such projects.
- Versatility: Acrylic paint can be used on various surfaces, including glass, allowing for different techniques such as layering and blending. This versatility enables artists and DIY enthusiasts to achieve a wide range of artistic effects and finishes on their lamp shades.
- Quick Drying Time: One of the significant advantages of acrylic paint is its fast drying time, which allows for quicker project completion. This feature is particularly beneficial when working on lamp shades, as it minimizes the waiting period between coats and enables immediate handling.
- Vibrant Colors: Acrylic paints are known for their bright and vivid colors, which can enhance the aesthetic appeal of glass lamp shades. The rich pigmentation ensures that the colors remain true and striking, providing a beautiful illumination when the lamp is lit.
- Water-Based and Low Odor: Being water-based, acrylic paints are easy to clean up with soap and water, and they emit minimal odors compared to oil-based paints. This makes them safer and more pleasant to work with, especially in indoor environments where ventilation might be limited.
- Durability: Once cured, acrylic paint forms a resilient surface that is resistant to chipping and fading, ensuring that the design on the glass lamp shade lasts over time. This durability is particularly important for items that will be frequently handled or exposed to light.
- Customizability: Acrylic paints can be easily mixed to create custom colors, allowing for personalized designs on glass lamp shades. This feature enables crafters to match specific color schemes or create unique patterns that reflect their individual style.
How Does Enamel Paint Perform on Glass Surfaces?
Enamel paint is often considered for projects involving glass surfaces, such as lamp shades, due to its durability and finish.
- Adhesion: Enamel paint typically adheres well to glass surfaces when properly prepared, making it suitable for decorative items.
- Finish: It provides a glossy, smooth finish that enhances the aesthetic appeal of glass lamp shades.
- Durability: Once cured, enamel paint offers a hard, durable surface that is resistant to scratching and chipping.
- Color Variety: Enamel paints come in a wide range of colors, allowing for creative designs on glass lamp shades.
- Application Process: Proper application techniques, including the use of a primer and appropriate tools, are crucial for achieving the best results on glass.
- Safety Considerations: When using enamel paint, ensure proper ventilation and safety precautions, as some formulations may emit strong odors or harmful fumes.
Adhesion: Enamel paint typically adheres well to glass surfaces when properly prepared, making it suitable for decorative items. It is essential to clean the glass thoroughly and may require sanding or priming to enhance the bond.
Finish: It provides a glossy, smooth finish that enhances the aesthetic appeal of glass lamp shades. This reflective quality can help to amplify the light from the lamp, creating a more inviting ambiance.
Durability: Once cured, enamel paint offers a hard, durable surface that is resistant to scratching and chipping. This makes it ideal for lamp shades that may be handled frequently or exposed to heat.
Color Variety: Enamel paints come in a wide range of colors, allowing for creative designs on glass lamp shades. This versatility enables crafters to match their décor or create unique, custom designs.
Application Process: Proper application techniques, including the use of a primer and appropriate tools, are crucial for achieving the best results on glass. Using a spray applicator or fine brushes can help create an even coat and reduce brush marks.
Safety Considerations: When using enamel paint, ensure proper ventilation and safety precautions, as some formulations may emit strong odors or harmful fumes. Wearing a mask and gloves is advisable to protect oneself from inhalation and skin contact.
What Makes Spray Paint a Popular Choice for Painting Glass?
Spray paint is a popular choice for painting glass due to its versatility and ease of use.
- Even Coverage: Spray paint provides a smooth, even coat that can cover the surface of glass uniformly without streaks or brush marks.
- Variety of Colors and Finishes: It is available in a wide range of colors and finishes, including matte, gloss, and metallic, allowing for creative expression.
- Quick Drying Time: Spray paints typically dry quickly, enabling users to complete projects faster and apply multiple coats in a shorter time frame.
- Ease of Application: The aerosol can design allows for easy application, making it accessible for both beginners and experienced users.
- Adhesion to Glass: Many spray paints are specifically formulated to adhere to non-porous surfaces like glass, ensuring durability and longevity of the paint job.
The even coverage provided by spray paint ensures that the paint applies evenly, eliminating the risk of visible brush strokes that can detract from the appearance of a glass lamp shade. This characteristic is especially important for achieving a professional finish on decorative pieces.
With a vast selection of colors and finishes available, spray paint allows for personalized designs that can match any decor style. Whether you prefer a bold pop of color or a subtle, frosted look, there’s a spray paint option to suit your needs.
The quick drying time of spray paint means that projects can progress swiftly, which is particularly beneficial for those working on multiple pieces or needing to complete a project in a limited timeframe. This feature allows for the layering of colors and effects without long waiting periods.
Spray paint’s ease of application is a significant advantage, as it requires minimal tools and surface preparation compared to traditional painting methods. Users can achieve great results with just a simple spray can, making it an attractive option for DIY enthusiasts.
Finally, the adhesion properties of many spray paints designed for glass ensure that the paint adheres well to the smooth surface, reducing the likelihood of chipping or peeling over time. This quality is essential for items like lamp shades that may be handled frequently or exposed to varying light conditions.
How Should You Prepare Glass Lamp Shades Before Painting?
To prepare glass lamp shades for painting effectively, follow these steps:
- Cleaning: Thoroughly clean the glass lamp shade to remove dust, grease, and residue.
- Sand the Surface: Lightly sand the glass to create a rough texture for better paint adhesion.
- Priming: Apply a suitable primer designed for glass surfaces to enhance paint durability.
- Choosing the Right Paint: Select the best paint for glass lamp shades, which should be suitable for the desired finish and durability.
Cleaning: Start by washing the glass lamp shade with warm soapy water or a glass cleaner. This step is crucial, as any dirt or oils can prevent the paint from adhering properly, resulting in a poor finish.
Sand the Surface: Use fine-grit sandpaper to gently scuff the glass surface. This process helps to create a better grip for the paint, ensuring that it adheres well and lasts longer.
Priming: After cleaning and sanding, apply a glass primer that matches the type of paint you plan to use. Priming is essential as it provides a uniform base for the paint and increases its durability and adhesion.
Choosing the Right Paint: Opt for a paint specifically formulated for glass, such as acrylic or enamel paint. The right paint will provide a durable finish and can be chosen based on whether you want a glossy or matte appearance, ensuring a professional look for your lamp shade.
What Are the Best Cleaning Methods for Glass Lamp Shades?
The best cleaning methods for glass lamp shades ensure clarity and shine while protecting the material.
- Warm Soapy Water: This method involves mixing a few drops of mild dish soap with warm water and using a soft cloth or sponge to gently clean the surface. It effectively removes dust and grime without scratching the glass.
- Vinegar Solution: Combining equal parts of white vinegar and water creates a natural cleaning solution that cuts through grease and mineral deposits. This method is particularly useful for shades that have accumulated hard water stains.
- Glass Cleaner: Commercial glass cleaners are specifically formulated to leave a streak-free finish on glass surfaces. Spray the cleaner directly onto the shade and wipe with a microfiber cloth for best results.
- Rubbing Alcohol: Using a solution of rubbing alcohol and water can effectively remove sticky residues or fingerprints. It evaporates quickly, leaving the glass clean without requiring a lot of drying time.
- Microfiber Cloths: These cloths are an excellent choice for polishing glass lamp shades because they trap dust and dirt without scratching. Using a dry microfiber cloth can help to buff the glass to a shine after using any cleaning solution.
- Soft-Bristled Brush: For intricate designs or hard-to-reach areas, a soft-bristled brush can help dislodge dirt without damaging the glass. This is particularly useful for lamp shades with detailed patterns or textures.
Is It Necessary to Use a Primer Before Painting Glass?
Using a primer before painting glass can significantly enhance the durability and adhesion of the paint.
- Adhesion: A primer designed for glass creates a better surface for the paint to adhere to, preventing chipping and peeling over time.
- Even Coverage: Primer helps in achieving a more uniform finish by reducing the risk of streaks or blotches in the final paint layer.
- Color Vibrancy: Using a primer can enhance the vibrancy of the paint color, especially if you’re applying lighter shades over a darker surface.
- Durability: A good primer can add an extra layer of protection against scratches and UV damage, prolonging the life of your painted glass lamp shade.
- Surface Preparation: Primers can also help to fill in any imperfections in the glass surface, making it smoother and better prepared for painting.
What Techniques Can Improve the Painting Process on Glass?
Several techniques can enhance the painting process on glass surfaces, particularly for lamp shades.
- Surface Preparation: Properly preparing the glass surface is crucial for paint adhesion. Clean the glass thoroughly with soap and water, and consider using isopropyl alcohol to remove any grease or residues. Lightly sanding the surface can also help create a texture that allows the paint to bond more effectively.
- Choosing the Right Paint: Selecting the best paint specifically formulated for glass is essential. Acrylic paint, enamel paint, or specially designed glass paints offer excellent durability and flexibility. Ensure that the paint you choose is compatible with the type of finish you desire, whether it be transparent, opaque, or frosted.
- Using a Primer: Applying a primer before painting can significantly improve the paint’s adherence and longevity. A glass primer creates a suitable base for the paint, ensuring even coverage and reducing the likelihood of peeling or chipping. Look for primers that are specifically designed for glass surfaces.
- Applying Multiple Thin Coats: Instead of applying one thick layer of paint, use multiple thin coats to achieve the desired opacity and finish. This method allows for better control over the application and reduces the risk of drips and uneven texture. Allow each coat to dry completely before applying the next one to ensure proper bonding.
- Utilizing Stencils or Tape: For intricate designs or patterns, using stencils or painter’s tape can enhance precision. This technique allows for clean lines and defined shapes, making it easier to create professional-looking designs. Be sure to press the edges of the tape firmly to prevent paint from seeping underneath.
- Correct Drying and Curing: After painting, allow the glass to dry fully in a dust-free environment. Depending on the type of paint used, some may require curing in an oven to achieve maximum durability. Follow the manufacturer’s instructions regarding drying times and curing processes to ensure the best results.
- Finishing Touches: Once the paint has dried, consider adding a clear sealer for extra protection. A clear acrylic sealer can enhance the shine and longevity of the paint, making it more resistant to scratches and fading. Ensure the sealer is compatible with the paint used to avoid any adverse reactions.
How Can You Achieve a Smooth Application on Glass Lamp Shades?
To achieve a smooth application on glass lamp shades, consider the following factors:
- Surface Preparation: Properly cleaning and preparing the glass surface is crucial for paint adhesion.
- Type of Paint: Choosing the right paint specifically formulated for glass will ensure better results.
- Application Technique: Using the right tools and techniques can make a significant difference in the smoothness of the finish.
- Finishing Touches: Applying a protective sealant can enhance the paint’s longevity and smoothness.
Surface Preparation: Start by thoroughly cleaning the glass lamp shades with soap and water to remove any dust, grease, or residue. Once cleaned, lightly sand the surface with fine-grit sandpaper to create a texture that helps the paint adhere better, and then wipe it down with a cloth to remove any dust created during sanding.
Type of Paint: The best paint for glass lamp shades is typically a spray paint or acrylic paint designed for use on glass surfaces. These paints provide excellent coverage and durability while also allowing for a smooth finish when applied correctly.
Application Technique: Use a spray can or an airbrush for an even coat, holding the can or tool at a consistent distance from the surface. Apply multiple thin layers rather than one thick coat to prevent drips and achieve a smooth, professional-looking finish.
Finishing Touches: After the paint has dried, consider applying a clear acrylic sealer to protect the paint and enhance its glossiness. This additional layer not only adds durability but can also help to create a smoother appearance on the surface of the lamp shade.
What Techniques Work Best for Creating Patterns or Stencils on Glass?
Several techniques can effectively create patterns or stencils on glass for decorative projects such as lamp shades.
- Adhesive Stencils: Using adhesive stencils allows for clean lines and precise patterns on glass surfaces.
- Etching Cream: This technique involves applying a chemical etching cream that removes the glass surface to create a frosted design.
- Glass Paint Pens: These pens are filled with specially formulated paint that can be drawn directly onto glass, allowing for intricate designs and details.
- Spray Paint: Using spray paint specifically designed for glass can cover large areas quickly and can be used with stencils for added creativity.
- Decoupage: This method involves adhering paper or fabric cutouts onto the glass surface using a special glue, creating unique patterns and textures.
Adhesive stencils can be purchased or created at home, providing a reusable option that can easily be repositioned. They adhere well to the glass, preventing paint from bleeding underneath, which results in crisp and professional-looking patterns.
Etching cream is a more permanent solution, as it chemically alters the surface of the glass. This method requires careful application and safety precautions, but it produces a durable, frosted effect that can be quite striking.
Glass paint pens offer a high level of control and are ideal for adding fine details to designs. These pens usually dry quickly and can be baked to set the design, ensuring longevity and washability.
Spray paint is great for achieving a uniform look over larger areas and can be easily layered with stencils to create complex designs. It’s important to choose a paint that is specifically designed for glass to ensure proper adhesion and durability.
Decoupage allows for a more mixed media approach, where various materials can be combined to create unique visual effects. This technique can also involve multiple layers of design, making it versatile for artistic expression on glass surfaces.
What Practices Should Be Followed After Painting Glass Lamp Shades?
After painting glass lamp shades, certain practices should be followed to ensure durability and maintain the quality of the finish.
- Allow Proper Curing Time: It’s essential to let the paint cure fully according to the manufacturer’s instructions. Curing time can vary, but typically it ranges from 24 hours to several days, depending on the type of paint used.
- Clean Gently: When cleaning painted glass lamp shades, use a soft, damp cloth instead of abrasive materials. Abrasives can scratch the paint and diminish its appearance, while a gentle wipe will help maintain the finish without damage.
- Avoid Direct Heat: Painted glass lamp shades should not be exposed to direct heat sources, as this can cause the paint to bubble or peel. Ensure that the lamp is used with appropriate wattage to prevent overheating.
- Store Properly: If the lamp shades are not in use, store them in a cool, dry place away from direct sunlight. Sunlight can fade the paint over time, while extreme temperatures can affect the integrity of the paint.
- Regular Inspections: Periodically check the painted surface for any signs of wear or damage, such as chips or scratches. Early detection can allow for timely touch-ups, helping to prolong the life of the painted finish.
- Use Appropriate Light Bulbs: When selecting light bulbs for your painted lamp shades, opt for LED or other low-heat options. These bulbs produce less heat than incandescent bulbs, reducing the risk of damage to the paint.
How Long Should You Allow Paint to Dry on Glass Lamp Shades?
The drying time for paint on glass lamp shades can vary based on several factors, including the type of paint used and environmental conditions.
- Acrylic Paint: Acrylic paint generally dries to the touch within 30 minutes to an hour, but it’s best to allow it to cure for at least 24 hours before using the lamp.
- Spray Paint: Spray paint can dry quickly, often within 15 to 30 minutes, but it should be left undisturbed for 24 hours for best results.
- Oil-Based Paint: Oil-based paints take longer to dry, typically requiring 6 to 8 hours to become tack-free and up to 24 hours for complete drying.
- Glass Paint: Specialty glass paints may require anywhere from 2 to 24 hours to fully cure, depending on the brand and formulation.
- Temperature and Humidity Considerations: Environmental factors can significantly influence drying times, with warmer and drier conditions speeding up the process.
Acrylic paint is water-based, which means it dries quickly. However, while the outer layer might feel dry, it may still be soft underneath, so a full cure time is essential to avoid damage when handling the lamp shade.
When using spray paint, the fine mist allows for quick surface drying, but the paint needs more time to fully adhere and harden. Ensure the area is well-ventilated during application and drying to prevent moisture from affecting the finish.
Although oil-based paints offer a durable finish, their longer drying time means you should plan accordingly. They also emit strong fumes, making ventilation critical during both application and drying phases.
These paints are specifically designed for glass surfaces and often provide a more durable and vibrant finish. Always check the manufacturer’s instructions for optimal drying and curing times, as they can vary significantly.
In cooler or more humid environments, paint can take longer to dry, so it’s important to account for your workspace conditions. Using a fan or a heat source can help accelerate drying but should be done with caution to avoid paint runs or uneven finishes.
What Types of Sealants Are Recommended After Painting?
The recommended types of sealants to use after painting a glass lamp shade include:
- Acrylic Sealant: This water-based sealant is ideal for use on painted glass as it provides a clear, protective coat that enhances the durability of the paint. It dries quickly and can be easily cleaned up with soap and water, making it a user-friendly option for those looking to protect their painted lamp shades.
- Polyurethane Sealant: Offering a tougher finish, polyurethane sealants can be used on glass lamp shades to provide a durable and long-lasting protective layer. Available in both water-based and oil-based formulas, it is important to choose a clear version to maintain the aesthetic of the paint underneath.
- Varnish: A clear varnish sealant is another excellent choice for protecting painted glass, as it not only adds a glossy finish but also shields the paint from scratches and moisture. This type of sealant is particularly beneficial for lamp shades that might be exposed to varying levels of humidity or cleaning.
- Epoxy Resin: For those seeking a high level of protection, epoxy resin sealants can provide an extremely durable finish that is resistant to chipping and scratching. While it requires careful application and longer curing times, the end result is a robust layer that can enhance the longevity of painted glass lamp shades.
What Common Mistakes Should Be Avoided When Painting Glass Lamp Shades?
Using the wrong type of paint can significantly affect the durability and appearance of your project. For glass lamp shades, look for paints specifically labeled for glass, such as acrylic enamel or spray paints designed for glass, to ensure a long-lasting finish.
Skipping primer can lead to the paint not bonding well with the glass. A good primer provides a better surface for the paint to stick to and enhances the vibrancy of the colors used.
Applying paint too thickly can lead to runs and uneven surfaces that detract from the beauty of the lamp shade. It is better to apply multiple thin coats, allowing each coat to dry before applying the next, to achieve a smoother finish.
Neglecting curing time can leave your painted glass vulnerable to damage. Following the manufacturer’s instructions on curing time is crucial to ensure the paint sets properly and withstands regular use.
Ignoring safety precautions can expose you to harmful substances in paint. Always use proper ventilation and wear masks and gloves to protect your health while working with paints and solvents.
What Errors Can Lead to a Poor Finish on Glass?
Several errors can lead to a poor finish on glass when painting, especially when working on projects like a glass lamp shade.
- Improper Surface Preparation: Failing to clean and properly prepare the glass surface can result in poor adhesion of the paint. Dust, grease, or old finishes can create a barrier that prevents the paint from sticking, leading to peeling or chipping later on.
- Choosing the Wrong Type of Paint: Not using paint specifically formulated for glass can result in a finish that does not adhere properly or that is not durable. The best paint for glass lamp shades is typically an acrylic or enamel designed for glass surfaces, as these provide better adhesion and flexibility.
- Inadequate Drying Time: Rushing the drying process can cause the paint to remain soft, leading to smudging or fingerprints. It’s important to allow sufficient drying time between coats and before using the lamp shade to ensure the finish hardens correctly.
- Environmental Factors: Painting in unsuitable conditions such as high humidity or low temperatures can negatively affect the drying and curing process of the paint. These factors can lead to uneven finishes or prolong the time it takes for the paint to set properly.
- Using Incorrect Application Techniques: Applying too thick a coat of paint or using the wrong tools (like brushes that leave streaks) can result in an uneven finish. Techniques such as spray painting or using a foam brush can help achieve a smoother and more professional look.
- Skipping the Primer: Not applying a primer designed for glass can lead to poor paint adhesion and a higher likelihood of paint failure. A good primer helps the paint bond to the glass surface and can enhance the overall finish and color vibrancy.
How Can You Prevent Issues Like Peeling or Chipping on Glass?
To prevent issues like peeling or chipping on glass lamp shades, consider the following methods:
- Choose High-Quality Glass Paint: Using high-quality glass paint that is specifically formulated for glass surfaces can greatly reduce the risk of peeling and chipping.
- Proper Surface Preparation: Cleaning and properly preparing the glass surface before painting is crucial for ensuring good adhesion and durability of the paint.
- Apply Thin Coats: Applying paint in thin, even coats rather than a thick layer helps prevent issues like drips and allows for better adherence to the glass.
- Use a Sealer: Applying a clear sealer over the painted surface can provide an additional protective layer that reduces wear and tear on the paint.
- Follow Curing Instructions: Adhering to the manufacturer’s curing instructions is essential; allowing the paint to cure properly can prevent issues such as chipping or peeling later on.
- Avoid Harsh Cleaning Products: When cleaning the painted glass lamp shade, avoid using abrasive or harsh chemicals that can damage the paint finish.
Choose High-Quality Glass Paint: Selecting a high-quality paint designed specifically for glass can significantly minimize problems like peeling and chipping. Such paints have better adhesion properties and are often more flexible, allowing them to withstand minor impacts without damage.
Proper Surface Preparation: It is vital to clean the glass thoroughly to remove dust, grease, or old paint residues. Lightly sanding the surface can also enhance paint adhesion, ensuring that the new paint adheres securely to the glass.
Apply Thin Coats: Using thin layers of paint rather than a single thick coat helps to ensure that each layer dries properly and adheres well. This technique also reduces the likelihood of runs or uneven texture, which can contribute to paint failure.
Use a Sealer: After painting, applying a clear sealer can protect the painted surface from scratches, moisture, and UV damage. This additional layer not only enhances the paint’s longevity but also gives it a polished finish.
Follow Curing Instructions: Each paint product may have specific curing instructions that should be followed closely. Allowing the paint to cure fully can significantly reduce the risk of chipping or peeling as the paint bond strengthens over time.
Avoid Harsh Cleaning Products: When maintaining the lamp shade, it’s best to use gentle cleaning agents and soft cloths. Harsh chemicals or abrasive materials can erode the paint surface, leading to premature wear and damage.
Related Post: