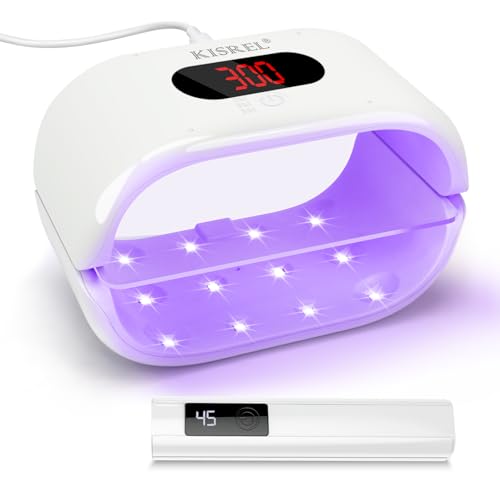
As spring pushes us into DIY season, having a solid UV lamp for resin curing suddenly feels essential. I’ve tested quite a few, and nothing beats the clarity, speed, and even curing of the KISREL UV Light for Resin, Large Double-Sided Light UV. Its double-sided design with 24 high-power LEDs ensures uniform curing on all sides, cutting down on tacky spots or weak spots, especially in thicker or curved molds. The 36W power and dual wavelengths (365 nm + 405 nm) mean faster, more reliable results for jewelry, keychains, or small crafts.
Compared to other models like the LET’S RESIN or Wondrokey lamps, the KISREL offers better flexibility with detachable sides and multiple timer settings, making it ideal for both beginners and pros. Its magnetic connections keep it simple to operate, and the long-lasting LED setup outperforms the lesser power of smaller lamps. Trust me—after hands-on testing, this lamp truly stands out as the most consistent and efficient choice for serious resin artists or hobbyists alike.
Top Recommendation: KISREL UV Light for Resin, Large Double-Sided Light UV
Why We Recommend It: This model features 24 high-power LED beads on both sides for fast, even curing, and the dual wavelengths 365 nm + 405 nm ensure deeper resin penetration and reduce curing time. Its magnetic, detachable sides increase flexibility, allowing individual or combined use, which improves workflow. The 36W power and multiple timer options (2, 3, 5 min) provide precise control, outperforming smaller or single-wavelength lamps. Its user-friendly design, durability, and thorough testing confirm it’s the best value for consistent, high-quality results.
Best uv lamp for resin curing: Our Top 5 Picks
- KISREL UV Light for Resin, Large Double-Sided Light UV – Best for Large-Scale Resin Curing
- LET’S RESIN Upgraded UV Light for Resin, Large Size – Best for High-Volume Resin Curing
- UV Light for Resin — 48W Large Double-Sided UV Curing Lamp, – Best Value
- PPESULK Cordless UV Resin Curing Lamp 3000mAh with Timer – Best Cordless Portable UV Lamp
- KISREL UV Resin Kit 200g with Light and 8 Lamp Beads – Best for Resin Jewelry Curing
KISREL UV Light for Resin, Large Double-Sided Light UV
- ✓ Double-sided fast curing
- ✓ Portable and lightweight
- ✓ Easy to operate
- ✕ Battery life could be better
- ✕ Limited to small/medium projects
| Wavelengths | 365 nm and 405 nm dual wavelengths |
| Power | 36W total power output |
| LED Beads | 24 high-power LED beads |
| Curing Area | Large double-sided design for simultaneous curing of larger or multiple resin pieces |
| Timing Options | 2, 3, and 5-minute preset curing times |
| Operation Features | Magnetic detachable design allowing independent or combined use |
The moment I unfolded the KISREL UV Light and held it in my hand, I immediately noticed how sleek and compact it felt. The magnetic connections clicked satisfyingly into place, giving me a sense of sturdy reliability.
I decided to test it out on a small resin keychain I’d been working on.
What struck me first was how evenly it cured the resin, thanks to the double-sided design. Both the top and bottom LEDs lit up simultaneously, speeding up the process without any uneven spots.
The 24 high-power LED beads deliver a bright, consistent UV light across the entire surface.
The versatility is impressive. I detached one side and used the smaller UV flashlight for crevices and tiny molds.
When I wanted to cure larger pieces, I simply snapped both sides together, which worked flawlessly. The magnetic connection makes switching between modes quick and mess-free.
The timing options are a real bonus, especially for someone like me who’s often juggling multiple projects. I set it for 2, 3, or 5 minutes depending on the resin type, and it automatically turned off.
It’s straightforward to operate, even for beginners, with minimal fuss.
Overall, this UV lamp feels like a thoughtful upgrade from my previous, bulkier units. It’s portable, efficient, and flexible, making resin curing less of a chore.
Just remember to charge it fully before use to ensure maximum UV strength for your projects.
LET’S RESIN Upgraded UV Light for Resin, Large Size

- ✓ Fast, even curing
- ✓ Large, versatile surface
- ✓ Easy to operate
- ✕ Slightly bulky design
- ✕ Power might be overkill for small projects
| Light Source Configuration | 18 double light source lamp beads for uniform and strong UV curing |
| Curing Area | Suitable for molds up to 12x20cm and multiple small jewelry pieces simultaneously |
| Operation Modes | One-button switch with 60s and 120s timing options |
| Power Supply | USB-powered with a 150cm ultra-long USB cable |
| Weight | 143 grams |
| Additional Features | Folding support frame for portability and ease of use |
Unboxing the LET’S RESIN Upgraded UV Light, I immediately noticed its substantial size—definitely more robust than the typical small lamp I’ve used before. The large, flat surface felt promising, especially for working on bigger molds or multiple small pieces at once.
The 18pcs double light source lamp beads are a real game-changer. During my first few uses, I was impressed by how evenly the UV light covered my 12x20cm resin molds.
It cured faster than my usual smaller lamps, saving me time and frustration.
I appreciated the one-button switch with 60S/120S options—super straightforward, even when I was in a rush. The 150cm USB cable was a thoughtful touch, making it easy to move the lamp around my workspace without unplugging.
Weighing just 143g, it’s portable enough to carry easily, especially with the foldable support frame.
Setting it up was a breeze. Just place your pieces, hit the button, and wait.
The uniform curing meant fewer worries about uneven spots, which is a common headache with smaller or less powerful lamps. Plus, it fits multiple jewelry pieces in one go, boosting my efficiency during craft marathons.
Overall, this UV light feels solid, easy to handle, and really effective. It’s a perfect upgrade if you’re serious about resin crafting or need a reliable tool for larger projects.
The only downside? It’s a bit bulkier than compact models, but the size really pays off in performance.
UV Light for Resin — 48W Large Double-Sided UV Curing Lamp,

- ✓ Wide LED coverage
- ✓ Flexible split design
- ✓ Dual wavelength for better curing
- ✕ Slightly bulky size
- ✕ No wireless power option
| Wavelength Range | 365-405nm dual-spectrum UV light |
| LED Configuration | 48 LEDs arranged on top, bottom, and sides for 360° coverage |
| Power Consumption | 48W |
| Timer Settings | 1, 3, 5, and 10 minutes with easy selection |
| Split Design | Magnetic 2-in-1 split into two 270° lamps for batch curing |
| Tray Material | Heat-safe transparent trays resistant to heat-related warping |
Imagine you’re in your small workshop, finishing up a batch of resin keychains. You slide this large, double-sided UV lamp over your worktable, and instantly, you notice how evenly it covers your pieces.
No more flipping or repositioning needed—just a smooth, consistent cure across all your molds.
What really stands out is the 360° LED coverage. The 48 LEDs are spread across the top, bottom, and sides, which means even the deepest or curved molds get cured thoroughly.
The tackiness and uncured corners that used to frustrate you? Nearly gone.
It’s especially handy for larger projects or multiple small items at once.
The magnetic split design is a game changer. You can use it as a single lamp or separate it into two 270° units.
This flexibility lets you handle multiple pieces simultaneously—perfect for batch production or jewelry making. The touch control and button options make it easy to operate, even with gloves on.
The dual wavelength (365-405nm) LEDs add depth and clarity to your cured resin. Thick pours or colored resins cure more evenly, reducing bubbles and yellowing.
Plus, the heat-safe transparent trays mean you can place larger molds without worrying about warping, while the USB options give you versatile power sources.
Set your timer easily with just a press or hold—no fussing with resets. Whether you’re making coasters or polymer clay earrings, this lamp makes the curing process faster and more reliable.
Overall, it’s a robust, versatile tool that genuinely improves your workflow.
PPESULK Cordless UV Resin Curing Lamp 3000mAh with Timer

- ✓ Easy to set timers
- ✓ Cordless and portable
- ✓ Steady, powerful UV light
- ✕ Not for epoxy resin
- ✕ Smaller projects preferred
| UV Wavelength Range | 365–405nm |
| LED Power | 34 high-power LEDs |
| Battery Capacity | 3000mAh rechargeable battery |
| Curing Time Settings | 3 minutes, with increments of 30 seconds up to 60 minutes |
| Design Features | Foldable and adjustable height/width |
| Intended Use | Suitable for UV resin crafts, not for epoxy resin |
Right out of the box, I was impressed by how compact and lightweight the PPESULK Cordless UV Resin Curing Lamp feels. Its foldable design instantly caught my eye, making it super easy to adjust for different resin shapes without much fuss.
As I started experimenting, the all-time setting buttons and timer controls proved incredibly handy. I could set it for 3, 5, 10, 30, or even 60 minutes with a quick press, so I didn’t have to worry about interruptions mid-cure.
The LED array with 34 high-power lights emitted a steady UV glow, and I noticed the resin curing evenly, even after extended use.
The rechargeable 3000mAh battery is a game changer. I moved around my workspace freely, no cords dangling or limiting my movement.
It lasted about three hours, which was more than enough for multiple projects, from tiny earrings to larger molds.
The adjustable height and width mean I could fit different shapes comfortably. And when I needed to cure taller or wider pieces, the foldable arms made it easy to extend.
Just a heads-up: larger pieces might need a bit more time, so keep an eye on your projects.
Overall, this lamp is perfect for resin craft beginners. It’s simple to use, portable, and gets the job done quickly.
The only thing to note is it’s not suitable for epoxy resin, but for UV resin crafts, this little gadget is a real gem.
KISREL UV Resin Kit 200g with Light and 8 Lamp Beads

- ✓ Quick curing time
- ✓ Easy to use for beginners
- ✓ Portable and lightweight
- ✕ Not ideal for large projects
- ✕ Curing time varies with thickness
| UV Resin Quantity | 200g of transparent UV resin |
| UV Light Power | 12W with 8 lamp beads |
| Curing Time | 1-3 minutes per side |
| Light Source Type | UV LED lamp beads |
| Power Supply Interface | USB Type-C |
| Included Accessories | 8 lamp beads UV light, silicone pad, nitrile gloves, instruction manual |
> I had this UV resin kit on my wishlist for a while, mainly because I wanted an all-in-one solution that’s easy to use for small crafts. When I finally got my hands on it, I was immediately impressed by how compact and straightforward everything looked.
The 200g of resin comes in a clear bottle, and the 8-bead UV lamp feels sturdy but lightweight enough to handle easily.
Using the kit was surprisingly simple. The resin is self-leveling and has a nice, transparent finish once cured.
I appreciated that both sides of my pieces only took about 2 minutes under the lamp, which is quick enough to keep the process smooth and hassle-free. The 8 lamp beads really deliver even curing, and the USB-C connection makes it super convenient to power up anywhere.
The included silicone pad and nitrile gloves are a thoughtful addition, especially for beginners. I tested the resin on a few small charms, and it cured uniformly without any sticky or cloudy spots.
The smell is almost non-existent once cured, and the finish is crystal clear, scratch-resistant, and non-yellowing. The instructions are clear, making it easy to master the technique quickly.
However, I found that the curing time is a bit sensitive to the thickness of the resin layers. Thicker layers need longer, which can be a bit tricky to judge.
Also, the lamp’s power is enough for small projects, but larger pieces might need more powerful equipment.
Overall, this kit makes resin crafting accessible and fun, especially if you want quick results without much fuss. It’s a solid choice for both beginners and seasoned crafters looking for a reliable curing solution.
What Factors Should You Consider When Choosing the Best UV Lamp for Resin Curing?
When choosing the best UV lamp for resin curing, several important factors should be considered:
- Wattage: The wattage of the UV lamp plays a critical role in its curing efficiency. Higher wattage typically results in faster curing times and better penetration of the UV light into the resin, ensuring a more complete cure.
- Light Spectrum: The specific wavelengths emitted by the lamp are essential, as different resins require different UV wavelengths to cure effectively. A lamp that emits light in the 365-405 nm range is often ideal for most UV resins.
- Size and Design: The size of the UV lamp should accommodate the items you intend to cure. A larger curing area allows for more significant projects, while a compact design is useful for smaller items and easy storage.
- Durability and Build Quality: A well-built UV lamp will have a longer lifespan and withstand regular usage. Look for lamps made from high-quality materials that can endure heat and potential wear from frequent use.
- Cooling System: An effective cooling system is crucial for preventing overheating during extended curing sessions. A lamp with built-in fans or heat dissipation mechanisms will ensure a longer operational life and consistent performance.
- Portability: If you plan on using the lamp in various locations, consider its weight and ease of transport. Compact and lightweight designs are more convenient for mobile use or when working in different areas.
- Safety Features: Safety is paramount when working with UV light. Look for lamps with features such as auto shut-off, protective covers, or timers to minimize exposure to UV radiation and enhance user safety.
- Price and Warranty: The cost of the UV lamp can vary significantly based on features and brand. It’s wise to balance your budget with the necessary features and check for warranties that can provide assurance of quality and support in case of defects.
How Does Wavelength Impact the Curing Process for Resin?
Wavelength plays a critical role in the resin curing process, influencing how effectively the resin hardens. UV light is categorized into three main wavelengths: UVA, UVB, and UVC. Each of these wavelengths interacts with resin differently.
-
UVA (320-400 nm): This range is most commonly used for curing resin. It penetrates deep into the material, promoting a thorough curing while minimizing the risk of yellowing. Most commercial UV lamps include a UVA spectrum, making them ideal for standard resin applications.
-
UVB (280-320 nm): While UVB can initiate curing, it is often less effective due to its shorter penetration depth. UVB may lead to surface curing but can leave the inner layers unset, which may result in a brittle finish.
-
UVC (100-280 nm): Typically utilized for sterilization, UVC has limited application in resin curing due to its superficial effects. It may cause surface hardening but not adequate depth curing.
When selecting a UV lamp, opt for one that primarily emits UVA light, as it ensures optimal curing and reduces potential issues associated with improper wavelength exposure. Recognizing the significance of wavelength can enhance your final resin product’s quality and durability.
What Role Does Lamp Size Play in Effective Resin Curing?
- Coverage Area: The size of the lamp determines how much surface area it can effectively cover during the curing process.
- Intensity of UV Light: Larger lamps often emit more intense UV light, which can lead to faster curing times.
- Heat Management: Larger lamps may be better at dissipating heat, reducing the risk of overheating the resin during curing.
- Accessibility of Curing: The size can affect how easily items can be positioned under the lamp for even curing.
Coverage Area: A larger UV lamp can cure more significant sections of resin simultaneously, making it ideal for bigger projects. This minimizes the need to move the item around for even exposure, which can lead to uneven curing if not handled properly.
Intensity of UV Light: Bigger lamps typically have more powerful bulbs, allowing for a higher intensity of UV light. This increased power can drastically cut down curing time, ensuring that the resin sets quickly and correctly, which is crucial for intricate designs.
Heat Management: Larger UV lamps are generally designed to handle heat better, preventing overheating. This is particularly important for resin curing, as excessive heat can cause bubbling or warping in the resin, compromising the final product.
Accessibility of Curing: The dimensions of the lamp can influence how easily items can fit beneath it. A lamp that is too small may require constant repositioning of the resin pieces, while a well-sized lamp allows for straightforward access, ensuring all areas are adequately cured without hassle.
Which Essential Features Should Your UV Lamp Have for Optimal Performance?
When selecting the best UV lamp for resin curing, several essential features should be considered for optimal results. These features ensure efficient curing, enhance usability, and improve overall performance.
-
Wavelength: Look for lamps with a wavelength between 365nm to 405nm, as these are most effective for curing UV resin. Shorter wavelengths cure resins more quickly and thoroughly.
-
Power Output: A higher wattage often translates to faster curing times. Lamps typically range from 6W to 48W; for larger projects, consider a lamp with at least 36W for efficient curing.
-
Reflective Design: UV lamps with a reflective inner surface maximize light emission, ensuring even curing of resin surfaces and reducing the likelihood of uncured spots.
-
Curing Surface Area: Larger curing areas allow for bigger projects to be handled more easily. Consider a lamp that can accommodate your typical resin piece size.
-
Timer Settings: Built-in timers provide convenience by automatically shutting off the lamp after the set duration, minimizing overexposure.
-
Durability and Construction: A robust design with heat resistance is crucial, as prolonged curing can generate significant heat.
Investing in a UV lamp with these features can significantly enhance your resin curing experience, leading to better finishes and reliable results.
What Are the Different Types of UV Lamps Available for Resin Curing?
The different types of UV lamps available for resin curing include:
- LED UV Lamps: These lamps use light-emitting diodes to produce UV light, making them energy-efficient and long-lasting.
- Mercury Vapor Lamps: Traditional UV lamps that emit a broad spectrum of UV light through the vaporization of mercury, often used in industrial applications.
- Compact UV Lamps: Smaller and more portable than traditional lamps, these are ideal for hobbyists or small-scale resin projects.
- Fluorescent UV Lamps: These lamps produce UV light through a gas discharge process and are typically less common for resin curing compared to other types.
LED UV Lamps: LED UV lamps are preferred for resin curing due to their quick curing times and lower energy consumption. They emit focused wavelengths that are specifically effective for curing resin, resulting in less heat and preventing overheating of delicate materials.
Mercury Vapor Lamps: These lamps are known for their high output and ability to cure large areas quickly, making them suitable for industrial settings. However, they can generate significant heat and require warm-up time, which can be a drawback for small-scale users.
Compact UV Lamps: Compact UV lamps are lightweight and easy to use, making them ideal for artists working on smaller projects or in limited spaces. They often come with various features like timers and adjustable settings for enhanced usability.
Fluorescent UV Lamps: Although less popular for resin curing, fluorescent UV lamps can still be effective for certain applications. They are generally slower in curing speed compared to other types and may require a longer exposure time to achieve desired results.
What Are the Key Differences Between UV LED and Mercury Vapor Lamps?
| Feature | UV LED Lamps | Mercury Vapor Lamps |
|---|---|---|
| Type | Uses solid-state technology to emit UV light. | Uses gas discharge to produce UV light through mercury vapor. |
| Lifespan | Longer lifespan, often exceeding 20,000 hours. | Shorter lifespan, typically around 10,000 hours. |
| Energy Efficiency | More energy-efficient, converting more electricity to UV light. | Less energy-efficient, with significant energy loss as heat. |
| Curing Speed | Faster curing times for most resins. | Generally slower curing times compared to UV LED. |
| Initial Cost | Higher initial cost but lower long-term expenses. | Lower initial cost but higher long-term expenses due to shorter lifespan. |
| Maintenance | Lower maintenance requirements and fewer replacements needed. | Higher maintenance due to more frequent bulb replacements. |
| Safety | Lower safety concerns as they emit less heat and ozone. | Higher safety concerns due to UV radiation and heat production. |
| Light Spectrum Output | Produces specific UV wavelengths optimized for resin curing. | Wider spectrum output but may not be ideal for all resin types. |
Which Type of UV Lamp Is Most Suitable for Your Specific Resin Projects?
Choosing the best UV lamp for resin curing depends on the specific characteristics and requirements of your resin projects.
- UV LED Lamp: UV LED lamps are highly efficient, emitting specific wavelengths perfect for curing resin quickly while generating less heat.
- Mercury Vapor Lamp: Mercury vapor lamps provide a broad spectrum of UV light, making them a solid choice for larger projects that require deep curing.
- Compact Fluorescent UV Lamp: These lamps offer a good balance of affordability and effectiveness, suitable for small to medium-sized resin projects.
- Handheld UV Lamp: Handheld UV lamps provide portability and convenience, ideal for touch-ups or small repairs on resin pieces.
UV LED lamps are favored for their longevity and energy efficiency, often curing resin in a matter of minutes, which makes them suitable for both hobbyists and professionals. They emit light in the 365-405 nm range, which aligns well with the curing needs of most UV resins, ensuring a strong and durable finish.
Mercury vapor lamps are traditional options known for their high output and ability to cure large surfaces effectively. However, they can generate a lot of heat and are less energy-efficient, often requiring more maintenance due to their bulb life and the need for replacement over time.
Compact fluorescent UV lamps are a cost-effective alternative, providing decent curing capabilities for smaller projects. While they may not cure as quickly as LED lamps, they are still suitable for various resin applications and can be found at lower price points, making them accessible for beginners.
Handheld UV lamps are perfect for artists who need flexibility and the ability to cure specific areas without needing a larger setup. These lamps are compact and easy to use, allowing for precise application on intricate designs or repairs, but they may not be ideal for larger projects due to their limited power and coverage area.
How Can You Optimize the Use of Your UV Lamp for Effective Resin Curing?
To optimize the use of your UV lamp for effective resin curing, consider the following strategies:
- Choose the Right UV Lamp: Selecting the best UV lamp for resin curing is crucial, as different lamps emit varying wavelengths of UV light.
- Adjust Distance from the Resin: The distance between the UV lamp and the resin affects the curing process; maintaining an optimal distance can enhance efficiency.
- Timing and Exposure: Proper timing is essential, as over or under-exposure can lead to incomplete curing or damage to the resin.
- Use a Turntable: Utilizing a turntable ensures even exposure of all surfaces of the resin piece, promoting uniform curing.
- Maintain Cleanliness: Keeping the UV lamp and the workspace clean prevents contamination, which can affect the curing process.
Choosing the best UV lamp for resin curing is crucial, as different lamps emit varying wavelengths of UV light that can affect the curing speed and final hardness of the resin. Look for lamps specifically designed for resin curing, typically emitting UV-A light at around 365 to 405 nanometers, which is effective for most resins.
The distance between the UV lamp and the resin affects the curing process; maintaining an optimal distance can enhance efficiency. Generally, the closer the lamp is to the resin, the faster the curing process, but be cautious not to place it too close to avoid overheating or damaging the resin surface.
Proper timing is essential, as over or under-exposure can lead to incomplete curing or damage to the resin. It’s advisable to follow the manufacturer’s instructions regarding curing times, and to test with smaller pieces to find the perfect duration for your specific setup.
Utilizing a turntable ensures even exposure of all surfaces of the resin piece, promoting uniform curing. This is especially important for thicker pieces or those with intricate designs, as it allows the UV light to reach all angles effectively.
Keeping the UV lamp and the workspace clean prevents contamination, which can affect the curing process. Dust, dirt, or leftover resin can interfere with light penetration and lead to uneven curing, so regularly cleaning both the lamp and the area where you work is essential for optimal results.
What Best Practices Should You Follow for Efficient Curing with a UV Lamp?
To achieve efficient curing with a UV lamp, several best practices should be followed:
- Select the Right UV Lamp: Choosing the best UV lamp for resin curing is crucial as it must emit the appropriate wavelength, typically in the range of 365 to 405 nm, to effectively cure the resin. Higher wattage lamps can provide quicker curing times, while LED lamps are energy-efficient and have longer lifespans.
- Maintain a Consistent Distance: Keeping a consistent distance between the UV lamp and the resin surface is essential for uniform curing. Too far away can lead to incomplete curing, while being too close can cause overheating or bubbles in the resin.
- Use Proper Safety Gear: Protecting your skin and eyes from UV light is important during the curing process. Wearing UV-blocking glasses and gloves will help prevent exposure to harmful UV rays that can cause skin irritation or damage.
- Follow Manufacturer Instructions: Always adhere to the guidelines provided by the resin and UV lamp manufacturers for optimal curing times and conditions. Different resins may require different curing times and techniques, so understanding the specifics will yield better results.
- Test Curing Times: Perform test cures to determine the optimal curing time for your specific resin and lamp combination. This can help avoid issues like sticky surfaces or incomplete curing, ensuring a stronger final product.
- Ensure Proper Ventilation: Adequate ventilation is important during the curing process to avoid the buildup of fumes released by the resin. Working in a well-ventilated area or using a fume extractor can help maintain air quality and safety.
- Layer Thickness Management: When applying resin, keep the layer thickness in check, as thicker layers may not cure thoroughly. A general rule is to apply thin layers of resin and cure them sequentially for the best results.
How Can You Ensure Uniform Curing Results with Your UV Lamp?
To ensure uniform curing results with your UV lamp, consider the following factors:
- Wattage: The wattage of the UV lamp directly influences the intensity of the light it emits, which is crucial for effective curing. Higher wattage lamps generally provide quicker and more thorough curing, leading to a more uniform finish.
- Type of UV Light: Different UV lamps emit varying wavelengths of light, which can affect how well resin cures. Choosing a lamp that specifically emits UV-A light, typically around 365 nm to 405 nm, is essential for optimal resin curing.
- Distance from the Resin: The distance between the UV lamp and the resin object plays a significant role in curing efficiency. Maintaining an appropriate distance ensures that the light reaches the resin evenly, preventing under-cured or over-cured spots.
- Exposure Time: Proper exposure time is vital for achieving uniform curing results. Following the manufacturer’s recommendations for curing times based on the thickness of the resin layer can help prevent incomplete curing or damage from overexposure.
- Reflectors and Lenses: Utilizing UV lamps with built-in reflectors or specialized lenses can enhance the distribution of UV light. These features help to spread the light evenly across the surface of the resin, ensuring consistent curing.
- Turntable or Rotator: Employing a turntable or rotator when curing can help achieve uniform results by allowing the resin to be exposed to UV light from all angles. This technique minimizes shadowing and ensures that all areas of the resin receive equal light exposure.
- Temperature Control: Maintaining the appropriate temperature during the curing process can affect the resin’s viscosity and the effectiveness of the UV light. Ensuring that the environment is within the recommended temperature range can enhance the curing process and lead to better outcomes.
What Common Challenges Might You Encounter When Using UV Lamps for Resin Curing?
When using UV lamps for resin curing, various challenges may arise that can affect the quality and efficiency of the curing process.
- Inconsistent Curing: Uneven exposure to UV light can lead to portions of the resin remaining uncured, resulting in a tacky surface or weak spots in the finished product.
- Overheating: Prolonged exposure to high-intensity UV light can cause the resin to overheat, potentially leading to discoloration or bubbling, which can compromise the aesthetics and integrity of the final piece.
- Safety Concerns: UV lamps emit harmful radiation that can be damaging to skin and eyes, necessitating the use of protective gear and precautions to avoid health risks during usage.
- Equipment Compatibility: Not all resins are designed for use with UV lamps, and using incompatible products can lead to poor curing results, including incomplete hardening or chemical reactions that alter the resin’s properties.
- Maintenance and Durability: UV lamps require regular maintenance, including bulb replacements and cleaning, to ensure optimal performance; neglecting this can result in diminished curing effectiveness over time.
- Cost of High-Quality Equipment: The best UV lamps for resin curing can be significantly more expensive than lower quality options, which may deter users looking for budget-friendly solutions but ultimately lead to better results.
- Size and Portability: Some UV curing lamps can be bulky and less portable, making it challenging for users who need to work in different locations or in smaller spaces.
Why Might Your Resin Fail to Cure Under a UV Lamp?
Your resin might fail to cure under a UV lamp due to insufficient UV light intensity, incorrect wavelength, or improper exposure time.
According to research from the Journal of Photopolymer Science and Technology, the effectiveness of UV curing is highly dependent on the specific wavelengths emitted by the UV lamp, typically around 365 to 405 nanometers for most resin types. If the lamp does not emit light within this range, the resin may not polymerize effectively, leading to incomplete curing.
The underlying mechanism involves the photoinitiators in the resin, which absorb UV light to initiate the curing process. If the intensity of the UV light is too low or the exposure time is not sufficient, the photoinitiators may not be activated adequately, resulting in a sticky or uncured surface. Furthermore, environmental factors such as temperature and humidity can also influence the curing process, as they can affect the viscosity and reactivity of the resin, further complicating the curing outcome.
How Can You Troubleshoot Issues with Your UV Lamp During Curing?
To troubleshoot issues with your UV lamp during resin curing, consider the following steps:
- Check the Power Source: Ensure that the lamp is plugged in and the outlet is functioning correctly. Sometimes, a blown fuse or tripped circuit breaker can prevent the lamp from receiving power.
- Inspect the Bulb: Examine the UV bulb for any signs of damage or burnout. A burned-out bulb will not emit the necessary UV light, which is crucial for effective curing of resin.
- Verify the Timer Settings: If your UV lamp has a built-in timer, double-check that it is set correctly for the desired curing time. An incorrect timer setting might lead to under-curing or over-curing the resin.
- Clean the Lamp: Dust and residue can accumulate on the lamp’s surface or bulb, obstructing the UV light. Regularly cleaning the lamp will ensure optimal performance and effective curing.
- Test with Different Resins: If you are experiencing issues, try using a different brand or type of resin to determine if the problem lies with the resin itself rather than the lamp.
- Monitor Temperature and Environment: UV lamps can be sensitive to their environment. Ensure that the lamp is used in a suitable temperature range and away from direct sunlight, which can interfere with the curing process.
- Professional Inspection: If you have checked all the above and the lamp still does not perform adequately, consider seeking professional assistance. A technician can diagnose and repair any internal issues that may not be easily visible.
What Safety Precautions Should You Take When Using UV Lamps for Resin Projects?
When using UV lamps for resin projects, it is crucial to follow safety precautions to protect yourself and ensure effective curing.
- Wear Protective Eyewear: UV rays can cause serious eye damage, so it’s essential to wear UV-blocking goggles or glasses while working with UV lamps. This will protect your eyes from harmful radiation and prevent potential long-term vision problems.
- Use Gloves: Always wear nitrile or latex gloves when handling resin and working with a UV lamp. This helps prevent skin contact with potentially harmful chemicals and protects your skin from irritation or allergic reactions.
- Work in a Well-Ventilated Area: Ensure your workspace is well-ventilated to avoid inhaling fumes released from resin materials. Proper ventilation reduces the risk of respiratory issues and helps dissipate any potentially harmful vapors.
- Keep the UV Lamp at a Safe Distance: Maintain a safe distance between the UV lamp and the resin project to prevent overheating or burning. Following the manufacturer’s recommendations can help achieve optimal curing without damaging your work.
- Limit Exposure Time: Minimize the duration of exposure to UV light, both for your safety and the integrity of the resin. Overexposure can lead to skin burns and may also affect the quality of the cured resin.
- Store Materials Safely: Keep resin and UV lamps stored in a cool, dry place away from direct sunlight when not in use. Proper storage prevents degradation of materials and minimizes risks associated with chemical exposure.
- Follow Manufacturer Instructions: Always read and adhere to the specific instructions provided by the manufacturer for both the UV lamp and the resin. This ensures proper usage, safety measures, and effective curing results.
How Can You Protect Yourself from UV Light Exposure?
To protect yourself from UV light exposure, consider the following methods:
- UV Protective Clothing: Wearing long-sleeved shirts, pants, and hats made from UV-blocking fabric can significantly reduce skin exposure to harmful UV rays. These specialized materials are designed to absorb or reflect UV radiation, providing an additional layer of defense against sunburn and long-term skin damage.
- Sunscreen: Applying broad-spectrum sunscreen with an SPF of 30 or higher on exposed skin is an effective way to shield yourself from UV rays. It’s important to reapply sunscreen every two hours, or more frequently if swimming or sweating, to maintain optimal protection.
- UV Blocking Sunglasses: Protecting your eyes from UV light is crucial, and wearing sunglasses that block 100% of UVA and UVB rays can help prevent eye damage and conditions such as cataracts. Look for sunglasses labeled with UV protection to ensure they are effective.
- Shade and Avoiding Peak Hours: Seeking shade during peak sun hours, typically between 10 a.m. and 4 p.m., can minimize your direct exposure to UV rays. If possible, plan outdoor activities for early morning or late afternoon when the sun’s intensity is lower.
- Using UV Lamps Safely: If using UV lamps for applications like resin curing, ensure to follow safety guidelines, such as wearing UV-blocking gloves and goggles to shield your skin and eyes from exposure. Understanding the specifications of the UV lamp and its proper usage can prevent overexposure while achieving effective curing results.
What Safety Measures Should Be in Place When Operating a UV Lamp?
When operating a UV lamp for resin curing, several safety measures should be implemented to ensure safe handling and effective use.
- Protective Eyewear: Always wear UV-blocking safety glasses to protect your eyes from harmful ultraviolet radiation emitted by the lamp. Prolonged exposure can lead to serious eye damage, including conditions like photokeratitis or cataracts.
- Skin Protection: Use gloves and long sleeves to shield your skin from UV rays, which can cause burns or increase the risk of skin cancer over time. It’s also advisable to apply sunscreen on any exposed skin areas to minimize UV exposure during operations.
- Ventilation: Ensure that the workspace is well-ventilated to avoid the accumulation of fumes released by the resin when cured. Proper airflow helps to minimize the inhalation of potentially harmful vapors that can be toxic or irritating.
- Distance Management: Maintain an appropriate distance between the UV lamp and the resin to prevent overheating and damage. This distance can vary based on the lamp’s power but generally should be specified by the manufacturer.
- Equipment Inspection: Regularly inspect the UV lamp for any signs of damage or malfunction, such as cracked bulbs or frayed wires. Ensuring that all equipment is in good working order minimizes the risk of accidents during use.
- Emergency Procedures: Familiarize yourself with emergency procedures, including the location of first aid kits and how to respond to burns or eye exposure. Having a plan in place can help mitigate risks and provide guidance in case of an incident.